


Just want to share with you a step by step tutorial on DIY root bleaching, since my roots were well overdue for one!
It's SO expensive being blonde! I always feel like my hair never grows, but somehow my regrowth still appears. It's too expensive to go to the salon every month or so, and it's not ideal to look like you're about to usher a line of traffic down the highway on your head.
DIY root bleaching isn't impossible to do yourself. It's always safer to go to a hairdresser, but $$ doesn't always allow it, so this is just the way that I've been doing it for years now, and it works really well for me!
(DISCLAIMER: I'm not a hairdresser, and bleach a powerful chemical that can cause itching, burning, breakage etc, so if you're unsure, it's worth it to leave it to a pro. It also helps to do a strand test prior to your full application, just to get an idea of what result you'll be getting. Follow this tutorial at your own risk - it's just a guide that has worked really well for me!)
OK lets get to it!
What you will need:
1. An old shirt that you don't mind staining

2. Bleach powder
I use Hi-Lift (Priceline $10.99)
(Blue bleach is preferable if you're aiming for a silvery blonde, or pastel colours, because it takes out some of the toning effort, but my local Priceline had run out, so I used the normal white bleach, which is just as good! Just make sure you have a good toner!)

3. Creme developer 30 Vol (9%)
I use Innovative (Priceline $10.99)

4. An applicator brush (and gloves if you want to be extra safe)
5. A comb with a thin handle (so that you can use it to section your hair easily)
6. A bowl for mixing

7. A toner
I use Nordic Blonde Toner (Priceline $8.99)

8. A hair treatment
Bleaching obviously isn't healthy for your hair, so having a hair treatment on hand to apply once this whole endeavour is complete will be super beneficial!
9. A friend who will hold up a mirror so that you can see the back of your head, or a realllly nice friend who will apply the bleach to the back of your head for you!
And you're ready to get started!
Step 1:
Comb your hair so that its easy to work with. Then section it into 3 or 4 parts, whichever you prefer, so that you can apply your bleach section by section, so that you don't miss spots.

Step 2.
Use the scoop that comes with the bleach to scoop some powder into your bowl followed by a little bit of creme developer. Add the developer in gradually, mixing as you go so the consistency of your mixture isn't too runny. It should be a creamy consistency sort of like cake icing.

Step 3:
Apply the mixture, beginning at the roots on the top of the head, and around your face. Then when you have covered all of the visible dark area, use the thin end of your comb to pull the piece of hair underneath over the to the other side of your head so that you can apply the mixture to those roots too.

Step 4:
Continue to apply your bleach mixture like this this over your entire head until your entire dark area is covered

Step 5:
Check how your colour is developing - you're aiming for a light to pale yellow colour
Step 6:
Rinse out. Be gentle when rinsing your hair because hair breaks more easily when it's wet, ESPECIALLY when it's just been through the bleaching process. Shampoo and condition.


Step 7:
Wait for your hair to dry a little, or towel dry it so that it's damp.
Step 8:
Apply your toner. I use the same method to apply my toner, as I do to apply my bleach. Roots / around my face first, and then flip pieces of hair over to coat all of the yellow areas, but because the hair isn't so stiff, you can massage the toner in like you would shampoo.


Depending on the result you want, is the decider in how long you leave your toner in.
It's a little more difficult to judge because toner is purple (But keep in mind - like I mentioned in my pastel hair tutorial, a light purple will always fade out to silvery white, and eventually blonde, so if you over tone, and your hair is lilac for a few days, that's no huge deal!)
Step 9: Wash out and put in your hair repair treatment.
My favourite repair treatment ever EVER evvveeeerrrrr is Redken Extreme Strength Builder Plus Intense Treatment Mask. I used it when I bleached my hair from burgundy to silver blonde in one day (stupid, I know), but it worked absolute miracles.
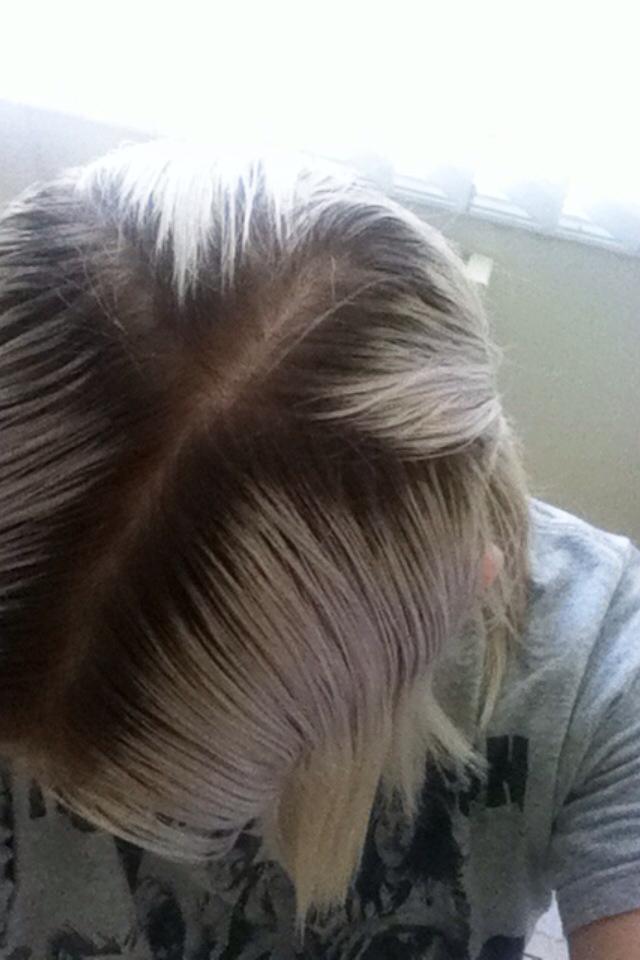
This is my result!

My hair is silvery/pastel purple, purely because that's my usual colour. I left the toner in for longer than necessary to overtone it, but you don't need to leave it on this long if you're only looking to remove brassiness. There will be recommendations on your toner that will help you too!
Hopefully this helped / worked for you :) Let me know if it did!!!
S.
Very cool. Wish I could see the Nordic blonde as a blonde but it looks like you got same results as myself using a Tigi bleach and 20 volume developer. It looks white when you apply it but when you wash off, there will be brassiness. I always envy those people who can bleach it to white...but I am growing my hair out and cannot afford any more damage, so I prefer this single process which maybe brassy and white when toned, better than damaged result. If you think of it, if you even do overlap with my method, you still will be okay because your hair can handle one more process....not so with hair bleached to the max. But it's my envy anyways lol. In any case having longer healthier hair is more important to me than having white hair, so I decided to follow my priority.
ReplyDelete