Sarah and Adriana. Beauty enthusiasts from Brisbane, Australia.

Thursday, September 19, 2013

How to: Bleach Your Roots at Home (With Pictures)

Hey dolls, Sarah here :)

Just want to share with you a step by step tutorial on DIY root bleaching, since my roots were well overdue for one!

It's SO expensive being blonde! I always feel like my hair never grows, but somehow my regrowth still appears. It's too expensive to go to the salon every month or so, and it's not ideal to look like you're about to usher a line of traffic down the highway on your head.

DIY root bleaching isn't impossible to do yourself. It's always safer to go to a hairdresser, but $$ doesn't always allow it, so this is just the way that I've been doing it for years now, and it works really well for me!

(DISCLAIMER: I'm not a hairdresser, and bleach a powerful chemical that can cause itching, burning, breakage etc, so if you're unsure, it's worth it to leave it to a pro. It also helps to do a strand test prior to your full application, just to get an idea of what result you'll be getting. Follow this tutorial at your own risk - it's just a guide that has worked really well for me!)

OK lets get to it!

What you will need:

1. An old shirt that you don't mind staining


2. Bleach powder
I use Hi-Lift (Priceline $10.99)

(Blue bleach is preferable if you're aiming for a silvery blonde, or pastel colours, because it takes out some of the toning effort, but my local Priceline had run out, so I used the normal white bleach, which is just as good! Just make sure you have a good toner!)


3. Creme developer 30 Vol (9%)
I use Innovative (Priceline $10.99)


4. An applicator brush (and gloves if you want to be extra safe)

5. A comb with a thin handle (so that you can use it to section your hair easily)

6. A bowl for mixing


7. A toner
I use Nordic Blonde Toner (Priceline $8.99)


8. A hair treatment
Bleaching obviously isn't healthy for your hair, so having a hair treatment on hand to apply once this whole endeavour is complete will be super beneficial!

9. A friend who will hold up a mirror so that you can see the back of your head, or a realllly nice friend who will apply the bleach to the back of your head for you!

And you're ready to get started! 


Step 1: 
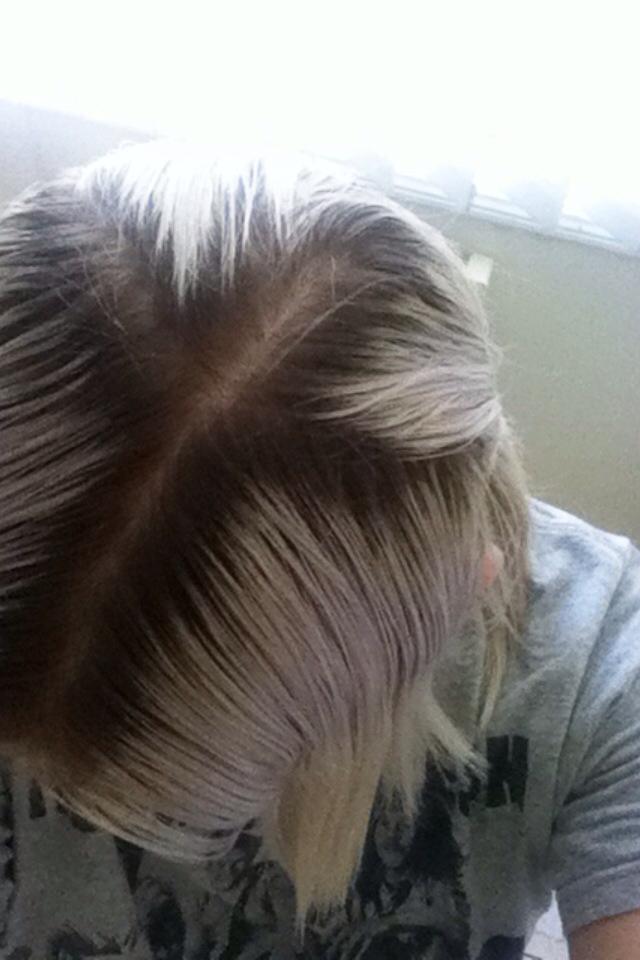
Comb your hair so that its easy to work with. Then section it into 3 or 4 parts, whichever you prefer, so that you can apply your bleach section by section, so that you don't miss spots.


Step 2. 
Use the scoop that comes with the bleach to scoop some powder into your bowl followed by a little bit of creme developer. Add the developer in gradually, mixing as you go so the consistency of your mixture isn't too runny. It should be a creamy consistency sort of like cake icing.


Step 3:
Apply the mixture, beginning at the roots on the top of the head, and around your face. Then when you have covered all of the visible dark area, use the thin end of your comb to pull the piece of hair underneath over the to the other side of your head so that you can apply the mixture to those roots too.


Step 4:
Continue to apply your bleach mixture like this this over your entire head until your entire dark area is covered


Step 5: 
Check how your colour is developing - you're aiming for a light to pale yellow colour


Step 6:
Rinse out. Be gentle when rinsing your hair because hair breaks more easily when it's wet, ESPECIALLY when it's just been through the bleaching process. Shampoo and condition.


Step 7:
Now you look kinda like the real slim shady
Wait for your hair to dry a little, or towel dry it so that it's damp.

Step 8:
Apply your toner. I use the same method to apply my toner, as I do to apply my bleach. Roots / around my face first, and then flip pieces of hair over to coat all of the yellow areas, but because the hair isn't so stiff, you can massage the toner in like you would shampoo.


Depending on the result you want, is the decider in how long you leave your toner in.
It's a little more difficult to judge because toner is purple (But keep in mind - like I mentioned in my pastel hair tutorial, a light purple will always fade out to silvery white, and eventually blonde, so if you over tone, and your hair is lilac for a few days, that's no huge deal!) 


Step 9: Wash out and put in your hair repair treatment.
My favourite repair treatment ever EVER evvveeeerrrrr is Redken Extreme Strength Builder Plus Intense Treatment Mask. I used it when I bleached my hair from burgundy to silver blonde in one day (stupid, I know), but it worked absolute miracles.


This is my result!

My hair is silvery/pastel purple, purely because that's my usual colour. I left the toner in for longer than necessary to overtone it, but you don't need to leave it on this long if you're only looking to remove brassiness. There will be recommendations on your toner that will help you too!


Hopefully this helped / worked for you :) Let me know if it did!!!


S.


How To: Winged Eyeliner (With Pictures)

After a few requests, we have decided to show you all how to do a neat and flattering winged eyeliner look. This procedure can be challenging if you do not have a steady hand, but as easy as it is to master, it is just as easy to correct if you make mistakes along the way.

What you will need:

1. Liquid or gel eyeliner, Adriana's preference is Maybelline's Master Precise Liner in Blackest Black

$13.95 - available at your local Priceline

This eyeliner is purse-friendly, whilst also being a fantastic product for beginners. It is super black and water-proof (not difficult to remove when necessary) and lasts the day/night. The formula is fantastic and does not burn my lids like most eyeliners do. The thin pen like application allows you to create a thin and precise liner look, whilst also giving you the flexibility to create thicker looks if desired.


2. Cotton buds


Not just for beginners.. and with a little saliva can correct any eyeliner mistake!

Procedure:

Firstly, begin by using your eyeliner to create an even line, following the natural shape of your eyelid. It is best to begin with a thinner line and build thickness from there! Make sure you remember to get thinner as you reach your inner eye so that your eyeliner blends into your tear duct.


Next it is time to begin the wing! We tend to use our bottom lash line as a guide and draw a line from the outer end of our lower lash line continuing to where you desire the height of your wing. This line if the most important part and should be a clean line (you can fix this at the end).


To create the curve of your wing, we then join the highest point of our previous line down into our initial base line - the trick to a perfect wing is to make this curve thin to begin with and add thickness till you are content.


Now that you have the outline of your wing, you can go ahead and carefully fill it in, extend the tail of your wing, and use cotton buds (if necessary) to tidy up any errors.


And there you have it! A perfect winged eyeliner that will compliment almost any eyeshadow look. Winged eyeliner can also change your natural eye-shape, elongating it and therefore flattering your face structure. We hope this has helped you all out, please leave any comments, questions or suggestions!

Stay rockin', dolls!


Tuesday, September 17, 2013

Clinique's Dramatically Different Moisturing Lotion

La-la-ladies! Adriana here with my holy grail moisturiser - Cliniques, Dramatically Different Moisturising Lotion ("DDML").

50ml - $29, 125ml - $49 - available at your closest Clinique Counter (David Jones and Myer stores)

Now don't get it twisted with Clinique's, Dramatically Different Moisturising Gel, although another fantastic product, it does not provide the same hydration benefits as the lotion, and I generally found myself reaching for the gel when I was not on Roaccutane/Accutane acne medication, and had typically oilier skin in comparison to my now normal/combination skin.

The consistency of this moisturiser is light, yet the hydration and added benefits are far from, DDML contains Hyaluronic Acid, Glycerin, Urea, Sunflower Seed Cake, Barley and Cucumber which all work to attract moisture to the skin, hold same hydration perfectly whilst strengthening the skins natural barrier against environmental factors. This moisturiser is pure moisture, without the oily/grease factor!


Clinique's DDML is easily affordable, and whilst you are paying a little more than a drug-store moisturiser, the benefits and hydration are second to none. With a single pump (as shown in the above image), you are able to moisturise your whole face. Sarah also loves this product, and we both find it is absolutely amazing under your primer for an even better base!

Soon to come, I will share with you all the Clinique products I am dead in-love with, and have used for many years.

**NOTE - The Dramatically Different Moisturising Lotion I have reviewed is the new formulated product. The old product had been associated with fewer fantastic ingredients and many users experienced breakouts (surprisingly I didn't). For all those who did not favour the previous formulation, I definitely think you should give the new one a whirl!

Stay beautiful :)

BB Seaweed & Mint Julips by Lush

Aloha dolls, Adriana here. Over the weekend I stopped by my local Lush and picked up a couple of products that I have been wanting to try and review for you all.

$16.95/75g - Lush Stores or online, www.lush.com.au

With the initial intent of picking up Love Lettuce, as reviewed by Sarah, in The Lush Trials so I could experience the magic she raves on about, I was quickly disappointed when they had none in stock. To my avail, the sales assistant told me that their BB Seaweed fresh face mask was quite similar to Love Lettuce, without the exfoliation - this was enough for me to purchase and give a whirl.


BB Seaweed is a cooling face mask that is predominantly lavender scented, and includes a bunch of awesome ingredients such as seaweed (obviously), kaolin, honey, aloe vera and rose. Together this combination of ingredients really works to cleanse, soften and give your skin a radient, healthy glow. I definitely feel like this mask has no extreme purpose like others of Lush that aim to target problematic skin, give an intense exfoliation or deep clean and is rather my purposeful as a gentle cleaning mask, that brings out your natural glow but also evens out my skin tone (which is generally not possible with masks that exfoliate or target spots). This mask would be worthless to anyone with problematic skin, and would be best for those looking to give their skin a little extra nourishment!

$9.95 - Lush stores or online, www.lush.com.au

Moving on to Mint Julips, a lip scrub. I was a complete lip scrub virgin until yesterday, and used to exfoliate my lips with a towel (totally a bad idea, especially if you are on Roaccutane/Accutane like myself). This product has definitely crept it's way into the treasure chest of my must haves (may need to try a few other brands before I declare a holy grail), this product is mint scented and obviously appears as any other lip scrub, like brown sugar. I think the best part about this product is that you do not require anything else to use it (e.g a towel or water to rinse), this product is 100% edible, and MY GOODNESS DOES IT TASTE GOOD, exactly like choc mint.. (this may become an unhealthy addiction). After smearing the brown sugar consistency over your lips and exfoliating them gently, you are then able to lick and eat the product off. To my knowledge there are also popcorn and bubblegum flavoured lip scrubs that Lush sell, that are definitely on my to-buy list!

Hope this was helpful! Please leave a comment for any reviews you would like us to do.

x

Monday, September 16, 2013

We Just Joined Bloglovin!

Hey dolls! We just joined bloglovin'

Click here to follow us there!


Are there any other platforms you guys would like to follow us on / suggest we should use to make it easier for you to stay up to date with our content?

xx

Illamasqua's Fair Beauty Pricing - Finally an Affordable High End Brand

I guess you dolls can tell by now, that we're not exactly ecstatic about the price of makeup

 in Australia. 

Sarah especially, after living in the UK where cosmetic pricing is A LOT more wallet friendly. This may
be old news now, as it's just over a year since it was implemented, but one of our favourite makeup brands Illamasqua took a stand! 


"It's entirely unjust that a woman in the UK pays just

 $24 for 
a lipstick, while a woman in Australia has to

 pay $40 for 
exactly the same product.

It's not fair. It's not right. And it's not how we want

to treat our 
customers. But it seems we're the only
ones who feel this way." 
- Illamasqua

I for one, wasn't clued in about this, until now - so what's it all about?


WELL. After receiving 20'000 signatures on Illmasqua's petition to put their Australian
 product pricing back in line with the UK, they won the battle against the Australian beauty
 industry and from the 1st of September 2012, dropped the price of all their products by an
 average of 35%.


The old price list was very similar to MAC's pricing. 

For example: A MAC Powder Blush is currently $41.00 > Illamasqua's Powder Blusher

WAS
$42.00 > It's now $28.00


Lipsticks that retailed for $39.00 are now $25.00


Concealer was $33.00 and is now $20.00


For a FULL PRICE LIST head to Diabolus In Cosmetica


All we can say is, what a great excuse to try out more Illamasqua products! We already both own and love their powder blush in "Lover" (Review up soon ;)) and will be back with a bunch more reviews and maybe even a few Instagram giveaways soon!

Follow us on IG and twitter so you don't miss out! @rockndollbeauty

Thursday, September 12, 2013

Liquid Eyeliner: Models Prefer vs MAC

Looking for a high end quality liquid eyeliner, but don't have $30+ to spend? I have a solution for you :)


MAC Liquid Eyeliner has always been my favourite liquid eyeliner because it dries perfectly matte, and is a really dark black, and doesn't dry steaky, or greyish. When I saw Models Prefer Liquid Eyeliner, I thought i'd give it a go because it looked very similar, and only cost a fraction of the price. Surprisingly, it's pretty much an exact dupe for the MAC liner. They both have pretty much the exact same features - except the price!

Models Prefer Liquid Eyeliner costs: $9.99 at Priceline


MAC Liquid Eyeliner costs: $32.00 at all MAC stores


The applicators are the same thickness, the liquid is the same consistency, and they both dry the same matte black colour. The Models Prefer brand eyeliner takes a few seconds longer to dry, but that's not a huge deal by any means, especially when it's saving you $22.00!


So if you're looking for a new eyeliner, or want to stop spending so much on high end ones, here's a great alternative! Let us know if this has helped you out, or if theres any other products you'd like us to review or use in a tutorial :)!


S.